

I'm always trying to learn new things. I recently shot a 6 pointer and had a few days to kill so I undertook the project below. This is the first time I've attempted anything like this and I don't have a clue what I'm doing so if you're foolish enough to copy me and you end up burning your house down, cutting a finger off or ruining your world class 20 pointer, don't blame me.
I've shot deer before but never butchered them until this year but I like learning and heck, it's either that or go to work, so I chose to do something that benefits me and my family. I didn't even know how to cut off the antlers but I just got my hacksaw and went to town. I had to trim it down later but that's what works for me: Never Measure and Cut Thrice. I figured it wasn't like it was a massive trophy so what's the worst that could happen?
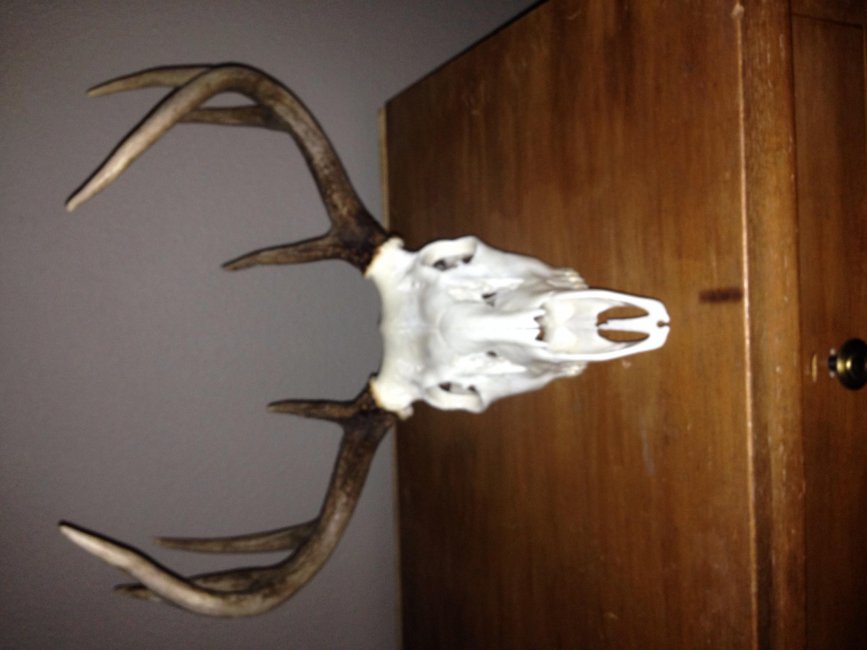
This is what I had after I sawed through the skull, scooped out the brains and had scraped for a while with my ESEE 3


If you know what you're doing, you'll realize I left too much skull on. And probably see some other mistakes I made that I don't even know.
Next, I set about boiling this thing. For about an hour. Everything is a learning process. In this step, I learned this is best done when the wife is out of the house. Especially if you're using one of her favorite pots.

After an hour of boiling, the remaining stuff is soft and easily removed. The toughest part was getting under the bases of the antlers. I used some small, sharp objects for this.

Once it's all cleaned up, I let it sit for a day and dry out. I covered the skull portion in baking soda. I figured this would help it dry out and also kill any lingering smell. It worked perfectly.
The next step was to start the mounting process. Here is where I realized I had left too much skull on. And that my cuts were crooked. So, I recut the bottom and the back. This time using straight lines. The resulting skull piece was much smaller and easier to fit level and flush to the mounting board.
For mounting, I traced a shape I wanted out of some scrap plywood and then cut it. I didn't bother with sanding or anything like that since this piece is completely covered. I made the shape to fit the skull but not be too big.
Next, it's drilling a few holes and screwing the skull down. I was concerned I was going to crack it but it all came out ok.
Here is what I was left with after cutting, drilling and mounting:


You'll notice in the above shot a screw in the top of the board but UNDER the skull. I screwed this in directly to the board and then let the skull rest on it. It allows the antlers to lean a little more forward and they look more pleasing to the eye. Well, to my eye.
Now comes trying to build up a base so I can cover it with some material and look presentable.
I found some old foam insulation and glued two pieces together. Then glued them to the plywood. Then used a knife to carve a rough shape to offer the covering fabric some support. Here's what it looks like:

Fabric. Since I didn't want to spend any money at all on this project, I found some old fabric laying around the house and cut a piece I thought would fit. I really wanted an old plaid hunting shirt to do it. But, the only ones I had, I wasn't willing to cut up. So, I used some fabric my wife had downstairs.

Cut some holes and lines for the antlers:

Fold the thing around the skull and board as best you can and staple it to the back with a staple gun. When I was pulling the fabric tight, the unevenness of the skull and foam showed every line. So, I got some stuffing (called "batting" by women. And by certain men who know about decorating and other icky fashion topics). You can buy this stuff at the craft store or you can cut open one of your wife's throw pillows to get some. Shove the stuff down under the cloth as you find places that need to be smoothed out. You can see it sticking out of the antler holes.

Next find some old crappy plaque. I found one that some foreign dignitaries gave me in a silly ceremony in South America. Took the sappy, engraved metal plate that was on it, off and then sanded it off and refinished it. Now, it's something actually useful!
Before:

After:

I guess I got tired of taking pictures between steps cause I don't have any of the following:
1. I took some old leather scraps and wrapped them around the base of the antlers to cover the stuffing sticking out. I used a hot glue gun to keep them in place.
2. I simply screwed the mounting plywood part to the plaque from the BACK of the plaque
3. The slug was recovered out of the deer and I decided to mount that to the plaque. I glued it with some Liquid Nails. I hope it stays. Time will tell. For those who care about such things, it is a Remington Accu-Tip 385 grain sabot slug. 12 gauge, 2 3/4". Fired from an 870 rifled barrel at 75 yards. Went in the vitals and lodged inside the skin on the far side. No exit wound. This is the first slug I've ever recovered. All the others have always gone completely through.
The finished product:

I've shot deer before but never butchered them until this year but I like learning and heck, it's either that or go to work, so I chose to do something that benefits me and my family. I didn't even know how to cut off the antlers but I just got my hacksaw and went to town. I had to trim it down later but that's what works for me: Never Measure and Cut Thrice. I figured it wasn't like it was a massive trophy so what's the worst that could happen?
This is what I had after I sawed through the skull, scooped out the brains and had scraped for a while with my ESEE 3
If you know what you're doing, you'll realize I left too much skull on. And probably see some other mistakes I made that I don't even know.
Next, I set about boiling this thing. For about an hour. Everything is a learning process. In this step, I learned this is best done when the wife is out of the house. Especially if you're using one of her favorite pots.
After an hour of boiling, the remaining stuff is soft and easily removed. The toughest part was getting under the bases of the antlers. I used some small, sharp objects for this.
Once it's all cleaned up, I let it sit for a day and dry out. I covered the skull portion in baking soda. I figured this would help it dry out and also kill any lingering smell. It worked perfectly.
The next step was to start the mounting process. Here is where I realized I had left too much skull on. And that my cuts were crooked. So, I recut the bottom and the back. This time using straight lines. The resulting skull piece was much smaller and easier to fit level and flush to the mounting board.
For mounting, I traced a shape I wanted out of some scrap plywood and then cut it. I didn't bother with sanding or anything like that since this piece is completely covered. I made the shape to fit the skull but not be too big.
Next, it's drilling a few holes and screwing the skull down. I was concerned I was going to crack it but it all came out ok.
Here is what I was left with after cutting, drilling and mounting:
You'll notice in the above shot a screw in the top of the board but UNDER the skull. I screwed this in directly to the board and then let the skull rest on it. It allows the antlers to lean a little more forward and they look more pleasing to the eye. Well, to my eye.
Now comes trying to build up a base so I can cover it with some material and look presentable.
I found some old foam insulation and glued two pieces together. Then glued them to the plywood. Then used a knife to carve a rough shape to offer the covering fabric some support. Here's what it looks like:
Fabric. Since I didn't want to spend any money at all on this project, I found some old fabric laying around the house and cut a piece I thought would fit. I really wanted an old plaid hunting shirt to do it. But, the only ones I had, I wasn't willing to cut up. So, I used some fabric my wife had downstairs.
Cut some holes and lines for the antlers:
Fold the thing around the skull and board as best you can and staple it to the back with a staple gun. When I was pulling the fabric tight, the unevenness of the skull and foam showed every line. So, I got some stuffing (called "batting" by women. And by certain men who know about decorating and other icky fashion topics). You can buy this stuff at the craft store or you can cut open one of your wife's throw pillows to get some. Shove the stuff down under the cloth as you find places that need to be smoothed out. You can see it sticking out of the antler holes.
Next find some old crappy plaque. I found one that some foreign dignitaries gave me in a silly ceremony in South America. Took the sappy, engraved metal plate that was on it, off and then sanded it off and refinished it. Now, it's something actually useful!
Before:
After:
I guess I got tired of taking pictures between steps cause I don't have any of the following:
1. I took some old leather scraps and wrapped them around the base of the antlers to cover the stuffing sticking out. I used a hot glue gun to keep them in place.
2. I simply screwed the mounting plywood part to the plaque from the BACK of the plaque
3. The slug was recovered out of the deer and I decided to mount that to the plaque. I glued it with some Liquid Nails. I hope it stays. Time will tell. For those who care about such things, it is a Remington Accu-Tip 385 grain sabot slug. 12 gauge, 2 3/4". Fired from an 870 rifled barrel at 75 yards. Went in the vitals and lodged inside the skin on the far side. No exit wound. This is the first slug I've ever recovered. All the others have always gone completely through.
The finished product:

 I like it, I've done several with the store bought kits. Gives me some future ideas.